
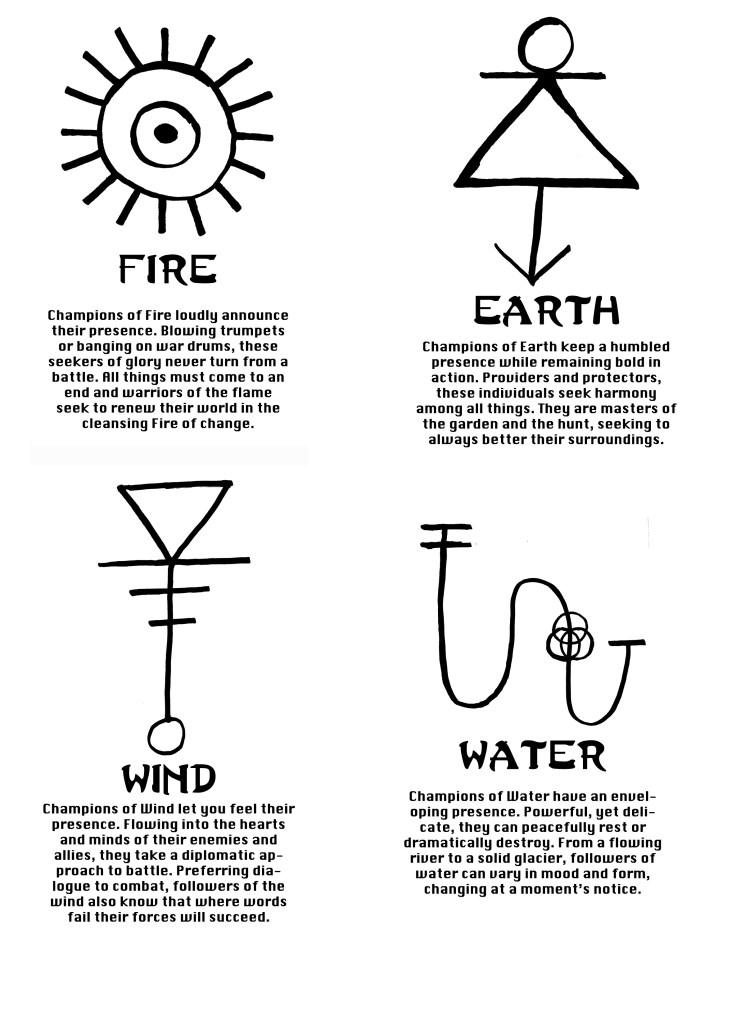
Centered around four Elemental approaches to overcoming advertises. (Earth-Water-Wind-Fire) E’thia, “a contest of truth” is a fast paced strategy game designed to be expanded upon by the players. We have freely provided the basic rules for anyone to enjoy and familiarize themselves with the gaming mechanics. The basic strategy game has two types of game play: a quick 5-20 min skirmish (uses one game board) or a 15-45 min full battle (uses two game boards placed together). Games are won by capturing your opponent’s leader. All of these basic mechanics presented are integral to the “E’thia Worlds” role play expansion that allows players a solo option or to work as a team building charterers to go on adventures, design maps, create story lines all while acquiring endless loot and fun. print a copy of the board here.
Skirmish and Battle Rules
set up for Skirmish/Battle
required pieces: Skirmish
1 8×8 square grid board (many boards are double sided having fixed wall placement on one side)
5 wall pieces
For a standard two player Skirmish each person uses 1 leader token and 10 squad unit tokens.
Required Pieces: Battle
2 8×8 square grid boards
10 wall pieces
For a standard two player Battle each person uses 1 leader token and 20 squad unit tokens. (During a battle the moment all units are only occupying one 8×8 board the other 8×8 board is removed for the rest of the game shrinking the map and forcing a skirmish.)
At the beginning of any the game all players roll 1 d6 ( d6 = six sided die) to determine wall placement. Highest rolling player then selects one of the three wall placement options.
1) Fixed wall placement: (Recommended for first time players) is a basic set up giving no player to much of an advantage.
2) Standard wall placement: Players take turns each adding one wall on the board until all have been placed.
3) Custom wall placement: Skirmish One player sets walls while the other chooses which side of the board to start on. Battle Each player sets walls on their 8×8 section of the Battle board
Many boards are double sided having fixed wall placement on one side. players can use both the fixed wall side of the board and the five walls to create more defenses if desired.
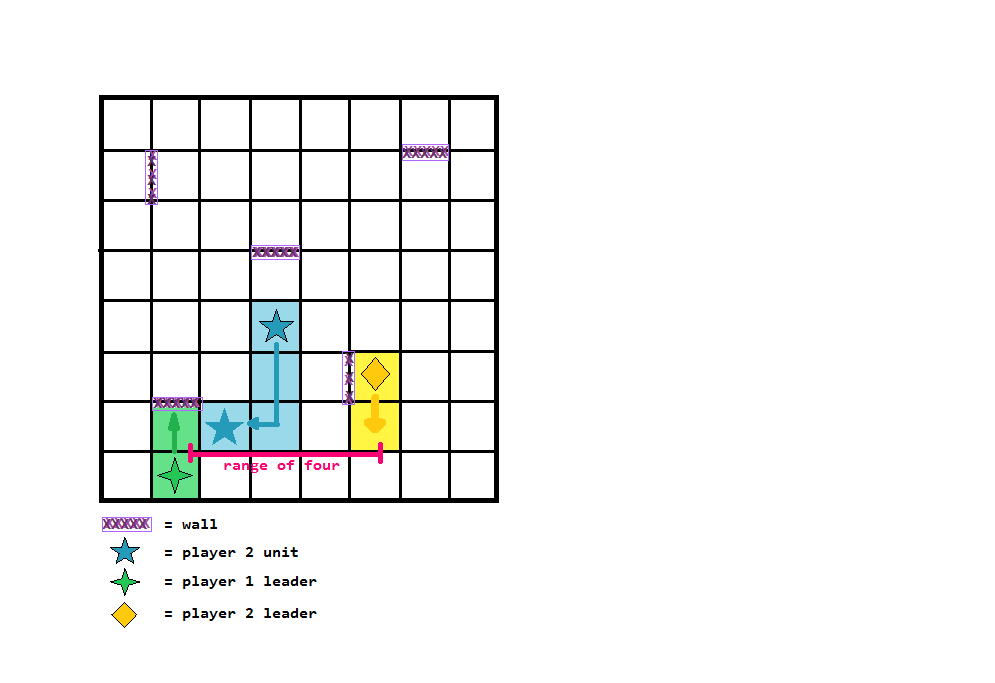
“fixed wall placement” plus “standard unit placement for first time players” (see example below)
rules about walls
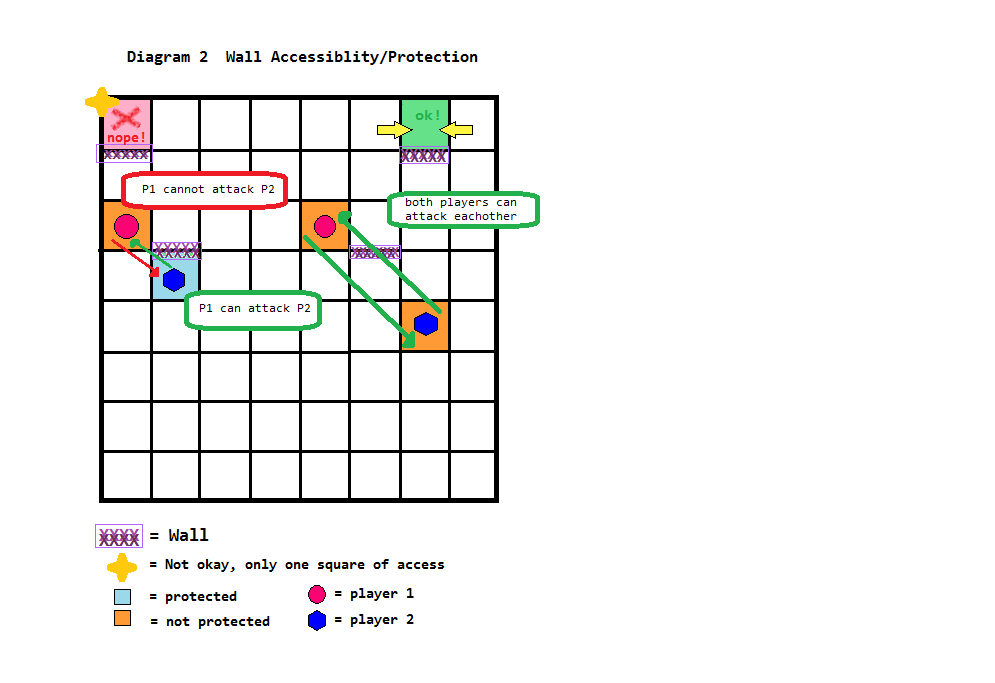
Walls can be placed between any line along two squares as long as all squares are accessible to units from two other squares. Wall do not take up space in a square.
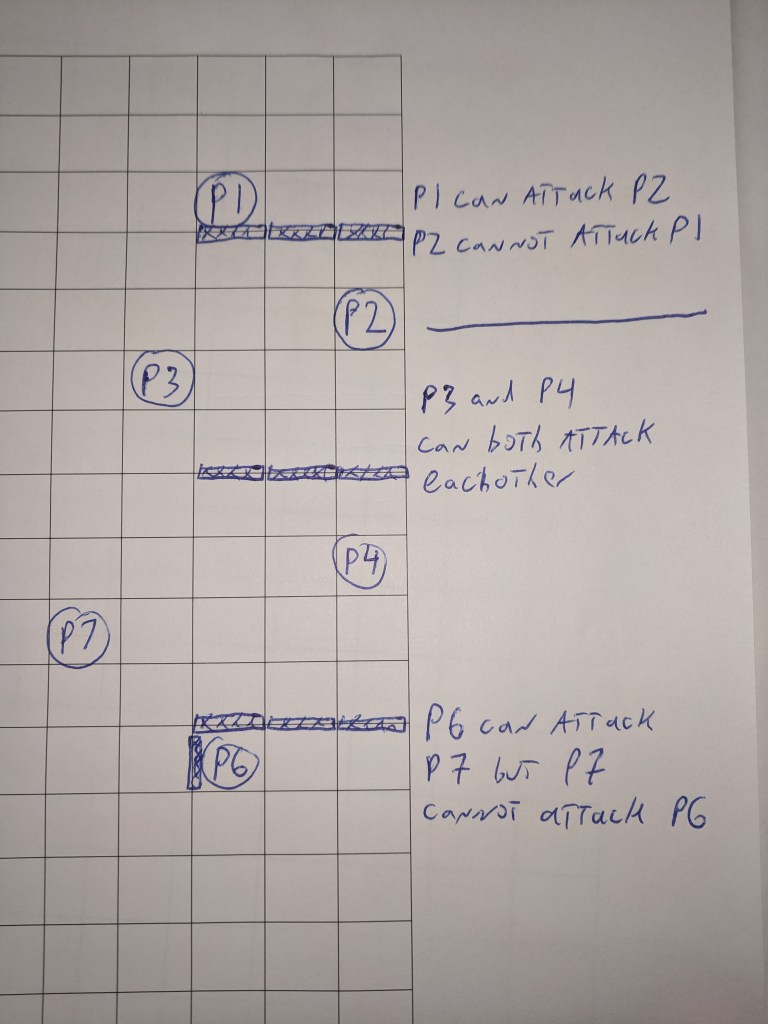
Units cannot move or attack over walls. A unit directly behind the wall is protected against diagonal attacks from the opposite side of wall. If walls are placed in a row or side by side, diagonal attacks are allowed to pass through as long as the unit being attacked is not directly behind the wall.
Once the walls are placed the player with the lowest roll decides which side of the board they want to start their squad on. In a skirmish units can be placed anywhere along the back two rows of the players side. In a battle units may placed anywhere along the back four rows. If all the back four rows become full players may place units on the next row up. Players then re-roll 1 d6, highest roll goes first proceeding clockwise around the board.
For 3-4 players reduce the number of tokens in half. Players then work in teams controlling their own leader and units against the other players on the opposite side of the board. When a player’s leader is captured all of their remaining units are removed from the board while their teammate’s units are unaffected. In a 3 player game one player may control two separate Leaders and armies as long as they do not go out of turn.
game play:
A player’s turn starts by rolling 1 d6 to establish the number of actions they can take. Once they have spent their actions it will become the other players turn. (players can chose to not use all of their actions) The two types of actions are moving or attempting to capture your opponent’s squad units. The game is won when when the opponent’s leader is captured. If a game is won on the first round of actions the other player gets one round of actions to force a draw.
To move a unit, first select the unit and after informing the other players which piece is selected, the player then rolls a d6 to determine the number of squares the unit can move. Units can move in any combination of left, right, forwards and backwards. Units cannot move diagonally, over a wall or through a space occupied by any unit. Once a unit is in range/line of sight of an opponent’s unit, the player may attempt to capture that piece.
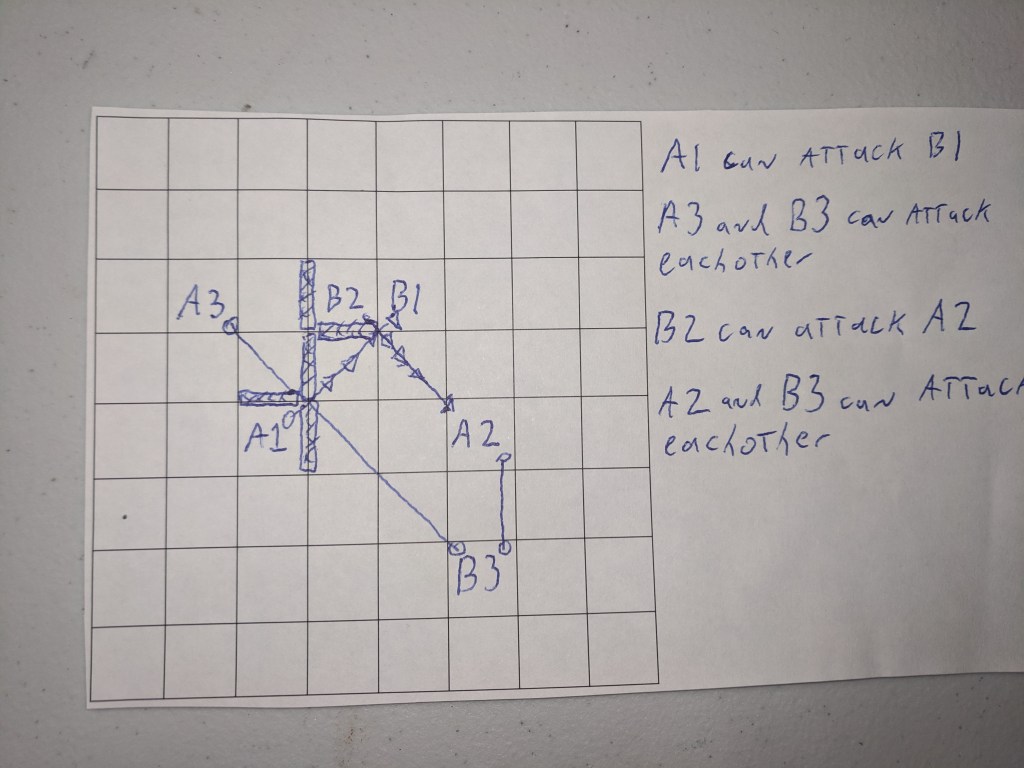
All units have an attack range/line of sight of 4 or less connected squares that form a straight line. Diagonal attacks are allowed if all squares are diagonally connected, but a player cannot attack over or through any other units. Capture attempts count as their own actions, separate from move actions.
Capture attempts are broken down into two categories, close combat and range attack.
During close combat the attacker must be in an adjacent square to the defender. (Diagonal OK) The attacker rolls 3 d6 (or 1 d6 three times) while the defender rolls 1 d6. Do not add the dice together. The player with the highest number die wins, capturing the opponent’s unit and removing them from the game board. Tie rolls are a miss, ending the action. In close combat the attacker can be captured so be careful.
A range attack occurs when there is one or more squares between the units. The attacker rolls 2 d6 and the defender rolls 1 d6. If the defender wins or there is a tie the attack is a miss and no units are removed from the game board.
In all games ties are a miss unless one or both of the pieces are a player’s leader. Leaders always win on ties against a squad unit. If a tie occurs between two leaders, the attacking leader wins the tie.
example of close combat
Player 1 is attacking Player 2, both roll their dice. Player 1 rolls a one, two, and a six. Player 2 rolls a two. Player 1 wins because the six is the highest number that was rolled. Player 1 then removes player 2’s unit from the board, capturing the piece.
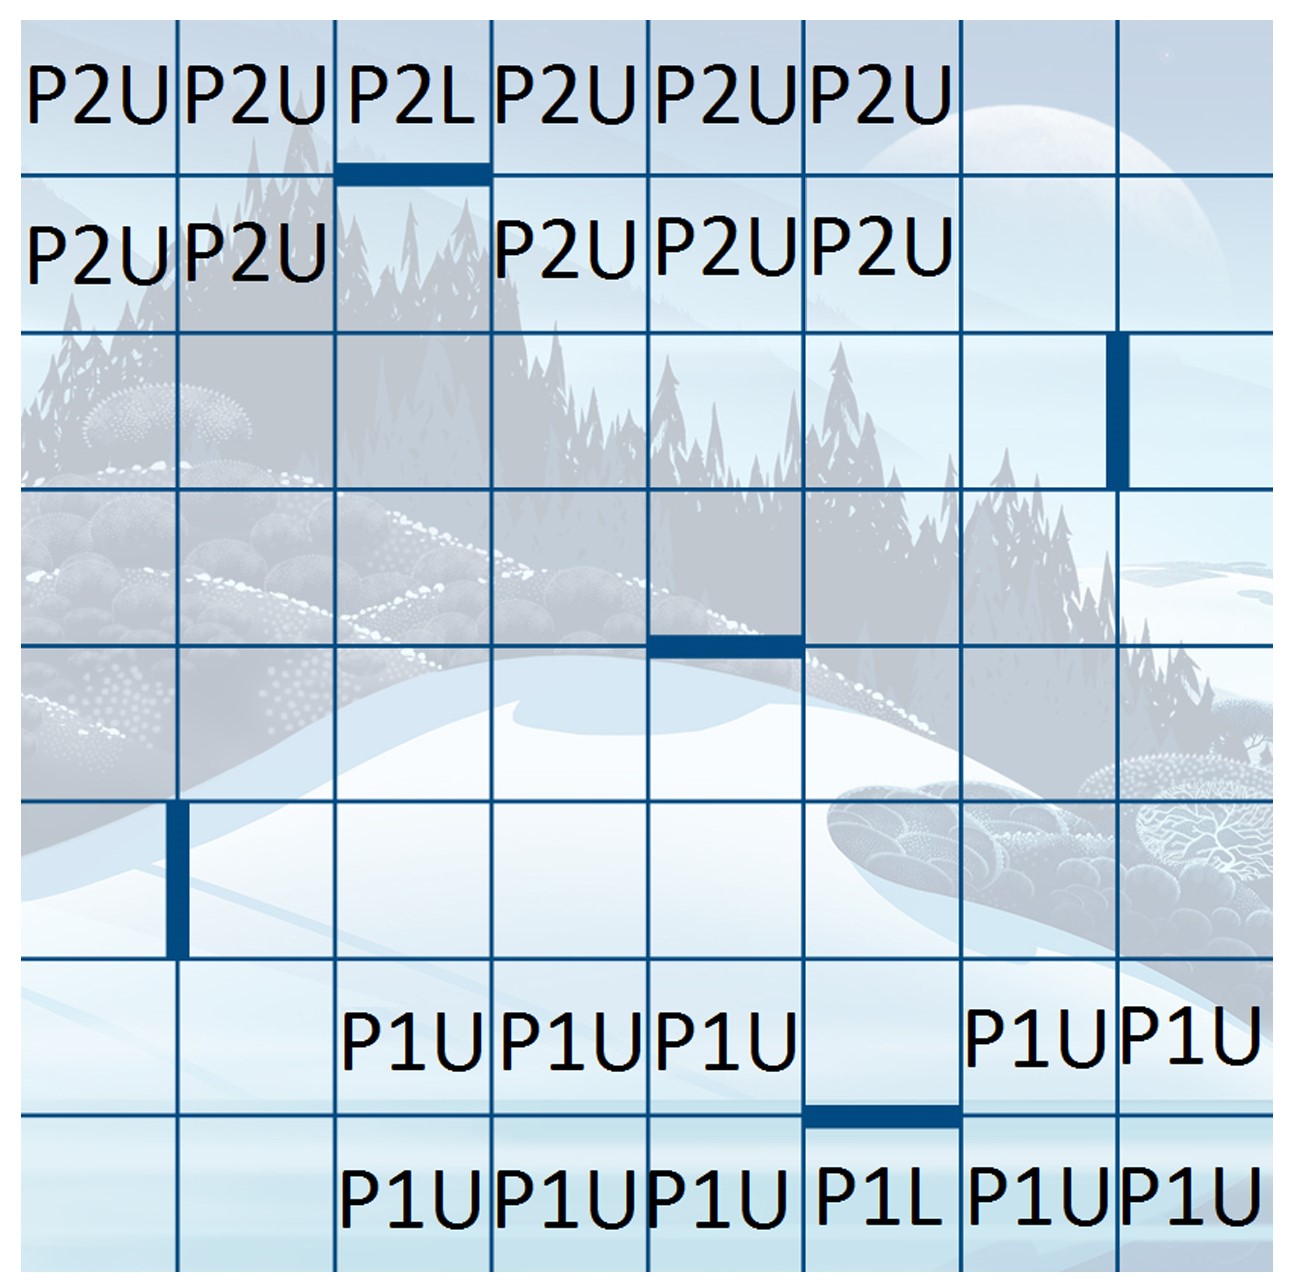
example turn:
Player 1 (P1) rolls for their actions, rolls a one. Since P1 is out of range for an attack and unprotected, they move one square forward to be behind a wall.
Player 2 (P2) rolls for their actions, rolls a six. P2 selects their last unit to move, rolls a three, and moves down two, left one for close combat. For a second action P2 attacks P1’s leader, they roll 3 d6 getting a highest die of six; P1 rolls 1 d6 also getting a six. Since leaders win on ties, P2’s unit is captured and removed from the game board.
P2 decides to move their leader for their third action, rolls a one. Moves one square for a range attack against P1’s leader. P2 attacks for their fourth action, rolls 2 d6 with a highest die of three. P1 rolls 1d6, high of five, attack is a miss. P2 attacks for their fifth action, high roll of six, P1 also rolls a six. Since attacking leaders wins on ties, P1 leader is captured and removed from the board leaving P2 as the victor.
Here some more more examples of wall defense
Now that you have the basics down here is the starting rules and quest for E’thia worlds the world/character building expansion.
E’thia Worlds
Welcome toE’thia Worlds! The first official expansion that allows players to create, exist, develop and adventure in any world they can imagine. As players move through the ever expanding quests they will encounter dangerous enemies, deadly traps, difficult locks and diplomatic matters. All while earning truth tokens that can be exchanged for endless loot to further customize your leaders. Individuals may go solo, work together or compete as they follow the constantly updated E’thia World adventures. Each new adventure provides detailed maps, character cards, story lines and possible rewards. Players may also use the unique Creation system to build custom games. All rules governing combat, movement and line of sight are identical to E’thia the Elements of Strategy unless otherwise stated (UOS). Walls that are placed placed together form full barriers blocking line of sight and preventing diagonal attacks through them.
Players can set up on any grid-ed surface, first filling out Leader cards by adding the name, background story, type of Leader, Elemental choice, space for Truth Tokens, Hit points and Special Items on the card. Then Players put walls, chests, traps, enemy units and their choice of leader/leaders on the map.
Players Choice Rule (PCR): Any time there are multiple options as to which Leader gets attacked or where an enemy unit moves to, Players Chose. In combat Ties are a miss (UOS)
Game Play Consists of rotating from the Leader round first (1) then dealing with any alerted or hostile enemy units second (2) before starting the Enemy round (3). After the enemy round return to the leader round to begin again.
Leader Round (1): Each leader takes turns rolling for their actions which include attacking, moving, performing a task such as lock picking, diplomacy, trap disarming or searching a chest. Once a leader has finished their actions another leader may roll 1d6 to start theirs. This can be done in any order as long as no leader gets more then one turn of actions during the Leader round. Once all leaders have preformed their actions it will become time for the enemy round. *During the Leader Round If any leader comes within line of sight of an enemy unit the enemy unit becomes(Alerted) Keep track of the number of enemy units alerted during the leader round. *If during the leader round an enemy unit is attacked but not captured by the end of the leader round then that enemy unit becomes (Hostile). If an enemy unit is alerted during play and then becomes hostile they are no longer counted as alerted.
Alerted/Hostile Units (2): At the end of the Leader round add up the number of all Alerted enemy units. Your Leaders will now face that amount ranged attacks on any Leader (PCR). Any Hostile units immediately move adjacent to a leader who will have to defend against one close quarters attack (PCR-players choice rule). Once all Alerted and hostile units have attacked it will become time for the Enemy round. Leaders can not use their re roll bonuses during this phase (UOS)
Enemy Round (3): Consists of three rounds of actions by rolling 1d6 for each in this order { 1-Ranged Enemy units} { 2-Close Quarters Enemy units } { 3-Boss units}
1-(Ranged) If any leader is 3 or less squares away (connected in any fashion) from a lv1 Ranged Enemy unit roll 1d6 for actions. Those leaders are subject to that amount of ranged attacks even if they are adjacent to the enemy unit. lv1 ranged enemy’s have a max of 3 attacks per round even if a higher number is rolled for actions and they can not be captured during their attack. Players may chose which leaders are attacked but they must be in range of the enemy unit. Roll a round of attacks for each Ranged enemy unit that have Leaders in range.
2- (Close) If any leader is 2 or less squares away from a Close Quarters Enemy unit and not blocked by a wall, move those enemy units adjacent to the leaders in range and roll 1 d6 for actions (PCR). Those leaders are subject to that amount of close quarters attacks. For lv1 close quarter enemy’s only roll once for actions which are split up between the enemy units do not roll a round of actions for each individual unit unless more difficult game play is desired. Max three actions pre round for lv1 enemy units combined. Lv1 Close quarters enemy have a line of sight of only two squares.
3- (Boss) If any leader is three or less squares away from a Boss then roll 1 d6 for actions. All leaders on the board are subject to that amount of ranged attacks regardless of distance to Boss (PCR). These attacks may be split up between any Leaders on the board. Only roll a round of attacks per Leader if more difficult game play is desired.
Once all enemy units have gone return to the Leader Round to begin again
Tasks: There are a wide variety of tasks that your leaders can preform during their turn including trading items between players, searching treasure chests, picking locks, casting spells and much more. Most tasks take up one action used during the leaders turn (UOS).
Treasure Chests: In order to search a chest the leader must be in an adjacent square and use one action. Roll 1 d6 if a 1 is rolled then a trap is sprung causing the leader loses one hit point and remove the chest from the board. A roll of 2-5 equals the amount of tokens awarded to the leader. A roll of 6 equals a special item or elixir that may be per-selected or chosen at random. Chests, Traps and Locks take up one full square blocking line of sight, movement or attacks through them. They are removed from the board once opened or disarmed leaving the space empty.
Traps –Locks: Their are two types of main traps-locks Blocking or Striking. Each type takes up one full square blocking line of sight, movement or attacks. Disarming or lock-picking requires the use of one action per each attempt. When a lock or trap is disarmed it’s removed from the board. Lvl 1 Traps/Locks are disarmed on a roll of a 5 or higher by any leader in an adjacent square, that Leader is then awarded tokens equal to the Trap/Locks level (UOS).
(Blocking Trap/Lock) -Leaders may not pass through the square until trap/lock is disarmed.
(Striking Trap/lock) – Leaders may pass through the square while suffering some kind of penalty usually the loss of a hit point. Striking traps are only removed once they are disarmed.
Diplomacy: There will be many times when a more diplomatic approach is required to complete a level or gain access to more loot. Leaders must be in an adjacent square for diplomacy attempts that each cost one action (UOS). Success awards the Leader tokens equal to difficulty level.
Trading items between Leaders: During a Leaders turn they may spend an action to trade any amount of items between a leader in an adjacent square. Trade to different leader requires the spending of a second action. Any amount of items or tokens may be transferred during a trade action between Leaders.
Capture of a Leader / Resurrection: All leaders have a base health of 0 plus 3 hit points. If a leader drops below 0 hit points they become unconscious. For a Lv1 Leader with 3 hit points to become unconscious they must fail to defend against 4 attacks from the enemy. These attacks do not have to be in order or happen during the same round. Once a Leader becomes unconscious lay that leader flat, or replace the unit with some kind of token to hold its place. Leaders and enemy units may move through or occupy a square of an unconscious Leader but Leaders can only attempt resurrection if they are in an adjacent square. If a leader is in an adjacent square to an unconscious leader they may forfeit a round of actions to attempt resurrection by rolling 1d6. A successful roll of a 5 or a 6 will resurrect the fallen leader at full health, while three failed attempts in any order will result in the leader being captured by the enemy forces and removed from the game board. Once resurrected that Leader must wait until the next Leader round to begin their actions.
Healing: Twice per game each leader may forfeit a round of actions to heal all of their hit points. Leaders can also use one of the many different items found throughout the game that will grant the opportunity to recover lost hit points.
Escape: If a game becomes too difficult or any Leader decides to leave the game during play they may chose to escape the map. This can be done by returning their Leader to the original starting location and spending one action to escape the board during the Leaders turn. The Leader is allowed to escape carrying any items or tokens they gathered during the game.
There are four types of lv1 leaders which players may chose from to fill out their leader card. All lv1 leaders start with a base health of 0 plus three hit points, a range of three along a straight line including diagonal and can only use 3 actions per turn even if a higher number is rolled for their actions. Leaders can attack but not move through each other and a leader must finish their actions before starting another leaders turn.
Ranger Leader: When attempting a ranged attack against an enemy unit the Ranger wins on a tie.
Striker Leader: When attempting a close combat attack on an enemy unit the Striker wins on a tie.
Defender Leader: When defending against an enemy units attack the Defender wins on a tie.
Scout Leader: Can move diagonally. (cannot move diagonally through walls that are placed together)
Each Leader may also chose an Elemental power that bestows the following bonuses (Earth +1 to Trap rolls, Leader can re roll defense die twice per Enemy round {cannot be used for alerted or hostile enemy units} (Wind grants +1 to diplomacy rolls, +1 range) (Water +1 to Resurrection rolls, Leader can re roll movement die twice per turn using the higher roll) (Fire +1 To Lock pick rolls, Leader can re roll their attack dice Twice per round)
There are Three types of lv1 Enemy units. Failure to defend against a lv1 enemy’s attack results in the removal of one hit point from the Leader.
Close Quarters Enemy: Basic enemy infantry, these units make up the bulk the enemy’s forces. These units can move around the board if they become Alerted, Hostile or get too close to a Leader. They are worth one token to any leader who captures them. They have a range of 2 squares connected in any fashion not blocked by a wall or line of sight.
Ranged Enemy unit: Extremely powerful but unable to move around the board. Ranged enemy’s can attack through walls or any other units without the need for a direct line of sight. Any leader who captures one is awarded 2 tokens. Ranged Enemy units can not be alerted or become hostile if attacked by any leader. (UOS) They have a range of 3 squares connected in any fashion.
Boss: Well versed in the art of destruction these units can lay waste to entire armies. They are worth 10 tokens to the leader who captures them and 5 tokens to all other leaders on the board. A Lv1 Boss has three hit points and is only defeated after four successful attacks by the leaders which do not have to be in any order or by the same leader. The attacks also do not have to be finished in a single Leader round.
Smokey Cauldron traders and stores: Between games or found at designated areas on maps, players may cash in their tokens for a wide range of loot including Elixirs, Relics and Rare items. Most elixirs must be used before a leader rolls for their actions (OUS). The use of an elixir does not require an action to be spent by the Leader (OUS). Once consumed an elixir is destroyed (OUS)
5 token Elixirs
Defense / Attack elixirs grant a +2 bonus to all defense or attack rolls until the beginning of the leaders next turn.
Speed elixirs grant a +2 bonus to all movement rolls until the end of the leaders turn.
Health elixirs allow a leader to gain back one lost hit point.
10 token Elixirs
Health Elixir heals all hit points
Tunnel Elixir allows a leader to slip to the other side of a wall they are adjacent to.
Attack Elixir gives a leader one free ranged attack on any enemy.
Quickening Elixir allows the leader to re roll their attack or defense dice using the highest roll.
Relics are permanent bonuses that come in all shapes and sizes raging from a tiny gem stone to a massive war hammer. While some relics come baring a description most are for the imagination of the players to create.
40 token Relics include bonuses such as ( +1 hit point ) (+1 to all attack, defense or movement rolls) (+1 to range) ( leader is allowed one more action per turn) ( One free resurrection of a fallen leader )
60 token Relics allows a leader to gain another type of leader bonus such as Striker, Ranger, Scout or Defense.
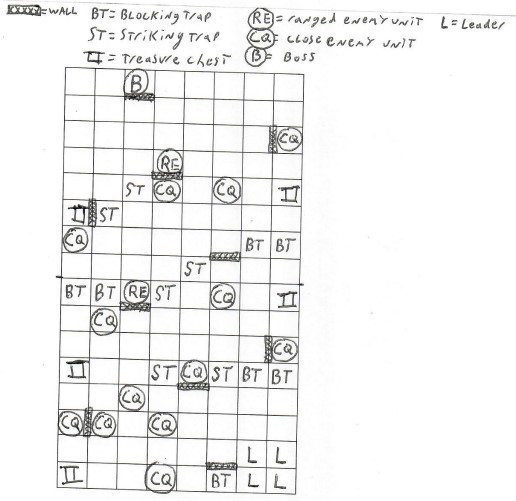
Kingdom of Coyote
This is a Lv1 starter quest built for 1 to 4 players using a total of 4 leaders in any combo on the board. One player may control more then one leader if there are fewer then four players. This map uses 2 8×8 boards, position of all units, treasure, traps and locks located on Adventure map.
Before you lays the Kingdom of Coyote. A desolate wasteland of rock and bone, vastly expanding over a patchwork maze of perilous cannons patrolled by vicious beasts. Somewhere deep within this shadowy place the prince of cats is missing, possibly abducted by the malicious Duke of Coyote. The Queen of cats has posted a large reward to all Leaders willing to help rescue her beloved prince.
Close quarters enemy units: Coyote lv1 (worth one token when captured)
Ranged enemy units. Hawk lv1 (worth 2 tokens when captured)
Boss: – Duke of Coyote lv1 (worth 20 tokens to the Leader who captures Boss and 10 tokens to all other Leaders on the board). {Special power CALL OF THE COYOTE}– Before each leader round begins roll 1d6, if a 1 is rolled place 3 close quarters enemy units adjacent to any leaders then begin the leader round as normal.
Tasks: – Before attacking the boss any player within range May use an action to attempt diplomacy instead. A Diplomacy roll of 5 or higher will pacify the Duke granting all leaders a 10 point elixir while causing the Boss to be defeated after only one successful attack from any leader. However a roll of 4 or less and all leaders are subject to one ranged attack no (PCR). No further Diplomacy attempts can be made once failed.
Treasure chests: A roll of 1 means the Leader loses one hit point and the chest is removed from the board. A roll of 6 equals a choice of three 5 point elixirs or one 10 point. The player may instead chose to attempt finding a relic in which case they re roll the d6. A roll or 5 or higher gives the player a permanent relic granting a +1 bonus to their choice of either movement, defense, attack or range that can be used once per leaders turn. A roll of 4 or less and no treasure is awarded to the Leader and the Chest is removed. This relic can only grant one type of bonus that is set once the Leader chooses the type. Chests take up the square they are in blocking line of sight and movement.
Traps: (Rattlesnake-Striking Trap) (Broken Bones-Blocking Trap) All Traps can be disarmed on a trap or lock-pick roll of 5 or 6. Failure results in the leader losing one hit point leaving the trap still armed. Striking traps cost one hit point to any leader that passes through them. All traps take up the square they are in and block line of sight and movement until disarmed.
Rewards: Successful lock pick, trap or Diplomacy attempts equal 3 Tokens to the Leader. Once the Duke of Coyote is Captured each Leader rolls 1D6. On a roll of 3 or higher they are awarded a permanent relic that grants one free resurrection to any Leader on the board each game which can be used any time during play. After a player uses this relic they will roll 1D6 on a roll of 4 or higher the relic is safe and can be used during another game. However on a roll of 3 or less the relic is destroyed.